Inside the Build of a Long-Range RFID Cloner
RFID Cloning: How Cards Get Hijacked? RFID cloning involves wirelessly capturing the unique identifier from a proximity card and replicating it onto a blank tag or emulating it with a device, allowing unauthorized access without the original card.
In many places like offices and gated communities, low-frequency (125 kHz) proximity cards are commonly used for access control. Typically, card readers have a short range, but some situations require extending this range for purposes like testing security or accessing unmanned entrances.
We developed a portable device capable of cloning these LF cards from 1–2 meters away. This post covers our motivation, the hardware and software involved, and our findings, enabling you to build, modify, or defend against long-range LF cloning.
Disclaimer: This blog is intended for educational and authorized security testing purposes only. Do not attempt to replicate or use the techniques described unless you have explicit permission to audit the target systems. The authors are not responsible for any misuse or illegal activity resulting from the information shared in this post.
Behind the Breach: Real RFID Risks
125 kHz proximity cards are widely used due to their simplicity and low cost. Readers usually operate at close range, providing security in controlled environments. However, this limited range is a vulnerability that can be exploited. By enhancing the reader’s antenna or RF front end, an attacker can capture card information from a distance.
In real-world scenarios, attackers can silently clone cards from unsuspecting staff or residents and later use those cloned credentials to gain unauthorized access. This risk motivated us to create a long-range LF cloning tool. Understanding these attacks helps improve security testing and enables defenders to implement stronger measures against credential skimming.
Mission Brief: Why We Built This Tool
Our long-range LF-cloning rig was conceived with three primary objectives in mind:
Realistic Attack Emulation
Accurately simulate how an adversary might harvest credentials from a distance (walking past an employee or resident) and later use those cloned cards to breach access controls.
Defender Empowerment
Provide blue-team and security-operations personnel with a hands-on tool to validate existing countermeasures (e.g., RFID shielding, reader placement, rolling-code implementations) under controlled conditions.
Customizability & Portability
Enable red-teamers and penetration testers to adapt the hardware and firmware for varied engagement requirements (different card formats, range targets, power budgets, and form factors) while keeping the rig lightweight and discreet.
These goals ensure our design not only uncovers real-world vulnerabilities in LF access systems but also equips security professionals with the knowledge and means to mitigate them.
Build Sheet: Off-the-Shelf Parts
Below is a breakdown of the key off-the-shelf parts we used to assemble our long-range LF-cloner. You can swap in equivalents as needed.
HID MaxiProx 5375: Serves as our primary long-range reader and is able to harvest 125 kHz card data from distances up to 1–2 meters.
iCopyX: A handheld RFID cloner that lets you simulate or write captured 125 kHz credentials onto blank tags in seconds.
ESP RFID Tool: Hosts a Wi-Fi module that spins up its own AP, letting you connect remotely (via phone or laptop) to view captured card data in real time.
Battery Holder & AA Cells: Provide a stable 12 V supply for our RF amplifier stage (key to pushing the read range past a few centimeters).
Build Guide: Assembling the Rig
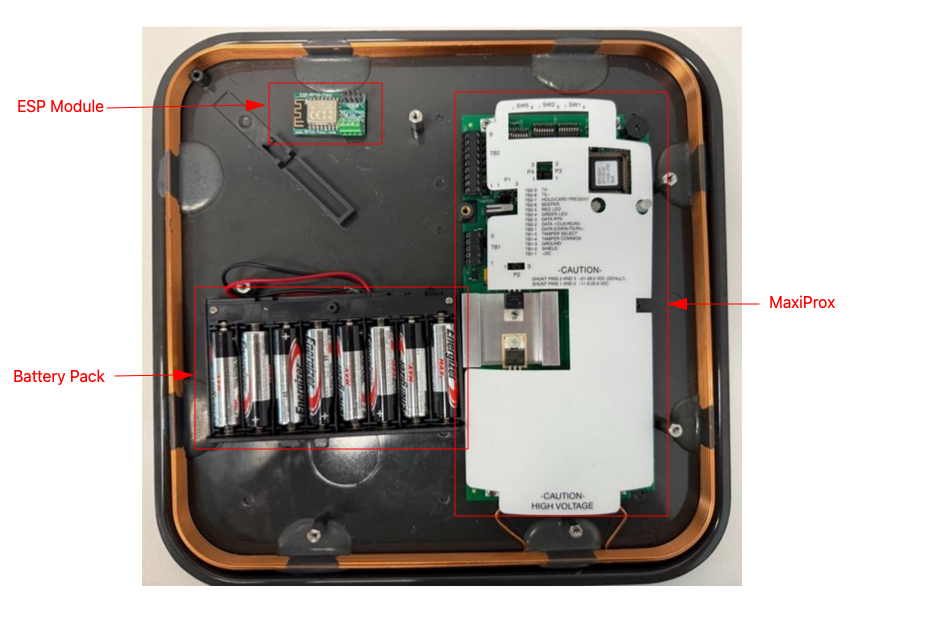
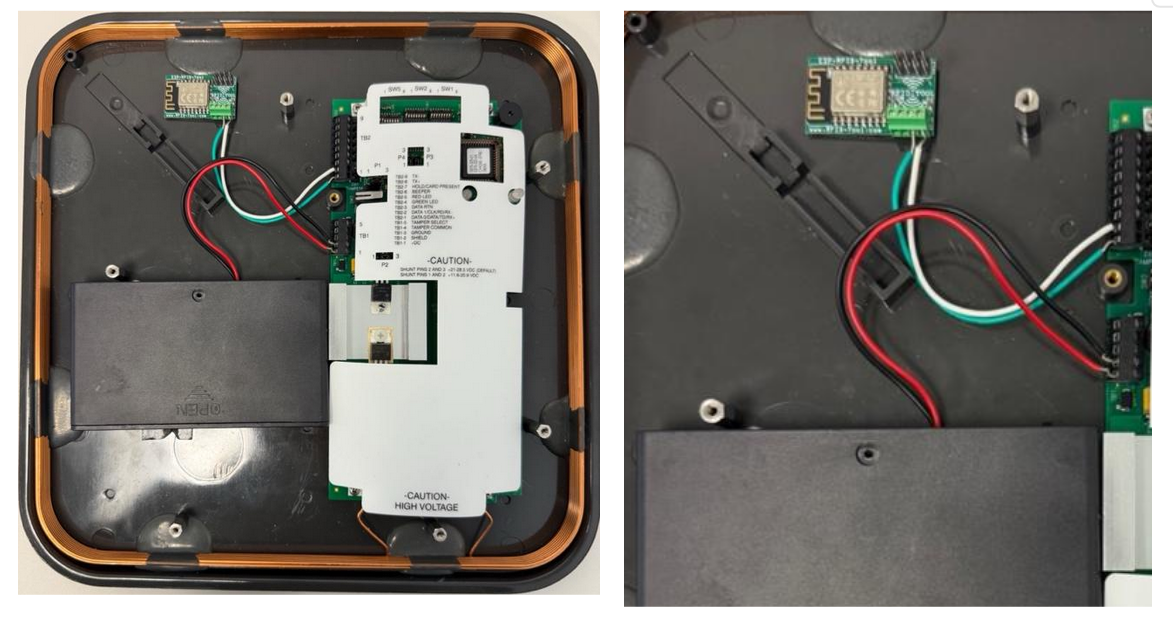
All Components (Before Connecting)
HID MaxiProx 5375 board: the main 125 kHz reader, with its white protective cover.
ESP-RFID-Tool module: ESP32-based board with its 4-pin screw terminal for data/power and built-in Wi-Fi.
Battery pack: 8×AA holder providing ~12 V.
ESP To MaxiProx Connection
The ESP will parse these signals and buffer the card UIDs.
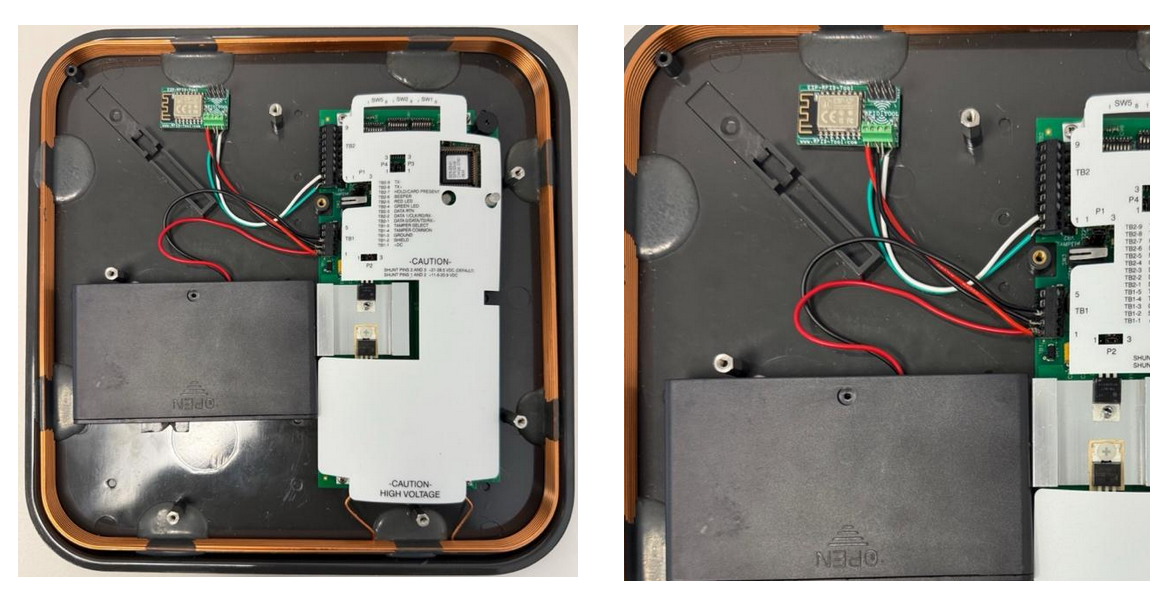
Powering the MaxiProx
Red (+DC) and black (SHELD) from the battery pack are routed into the MaxiProx’s TB1 connector (red to TB1-1 and black to TB1-2). This provides the high-voltage drive needed.
Powering the ESP Module
A second pair of red and black leads run from the same battery pack into the ESP-RFID-Tool’s power terminals.
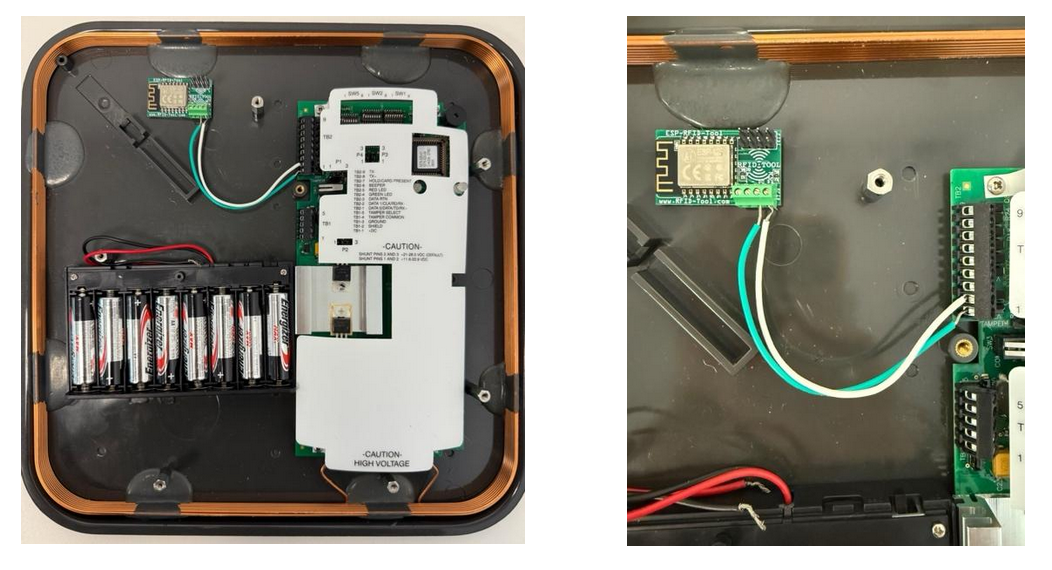
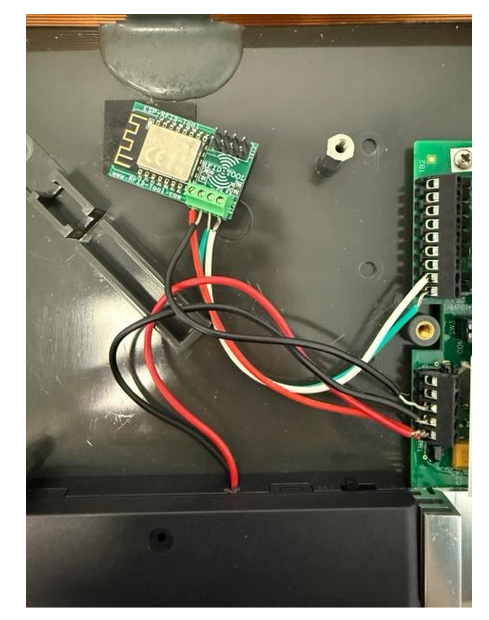
Close-Up of All Connections
Here you can see all five conductors secured: two for data (green/white) and two for ESP power (red/black), plus the MaxiProx power feed.
Updating the ESP Firmware for Live Capture
To ensure you’re running the latest features and bug fixes, you can easily flash or update the ESP’s firmware via its built-in web interface. Here’s how:
Download the latest release:
Visit the project’s GitHub Releases page: https://github.com/rfidtool/ESP-RFID-Tool/releases
Connect to the ESP hotspot:
Power on your device and join the Wi-Fi.
Firmware update:
You’ll see a simple upload form labeled “Firmware Update”.
Click Choose File, select the .bin file you downloaded, then hit Update
The ESP will reboot automatically once flashing completes (this takes ~20–30 seconds).
Login to new firmware:
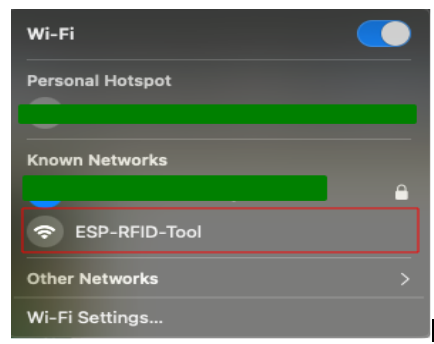
Now you are able to see the WIFI SSID “ESP-RFID-Tool”
By connecting to it, you are able to see the web page by navigating to “http://192.168.1.1”
Now by entering default credentials (Username: admin - Password: rfidtool) you can login and see captured data.
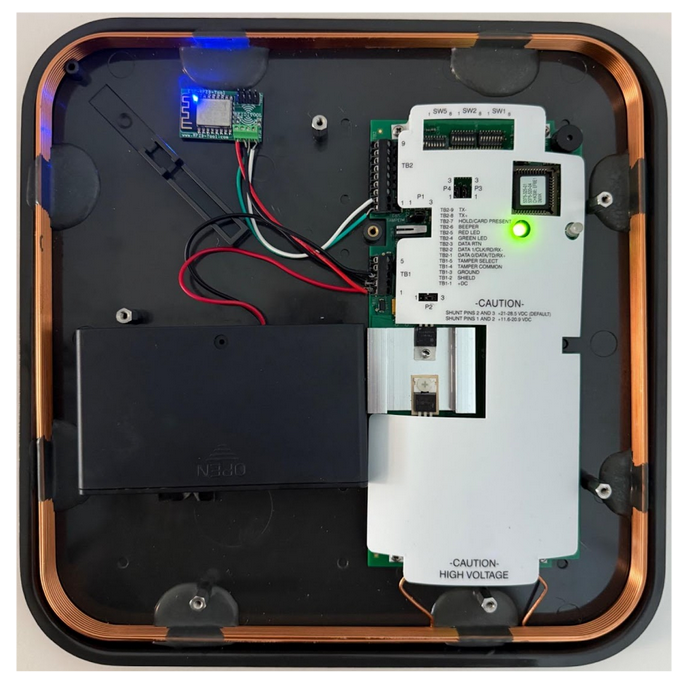
Power-On, Network Setup & Live Log Access
Apply Power
Once you snap in the batteries, you’ll see the MaxiProx board’s green status LED light up alongside the ESP’s blue power LED (as shown below).
Join the ESP Hotspot
On your laptop or phone, scan for Wi-Fi networks and connect to the SSID ESP-RFID-Tool.
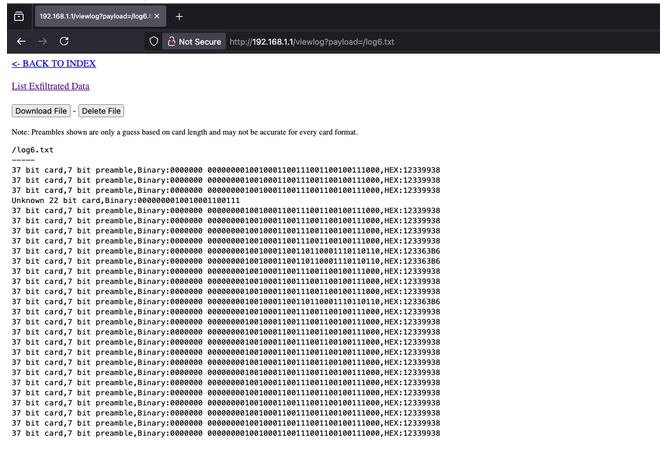
View Captured Card Data
Open a browser and navigate to http://192.168.1.1/logs. You’ll see real-time dumps of every card read by the MaxiProx, including bit-length, preamble, binary frame, and UID in HEX.
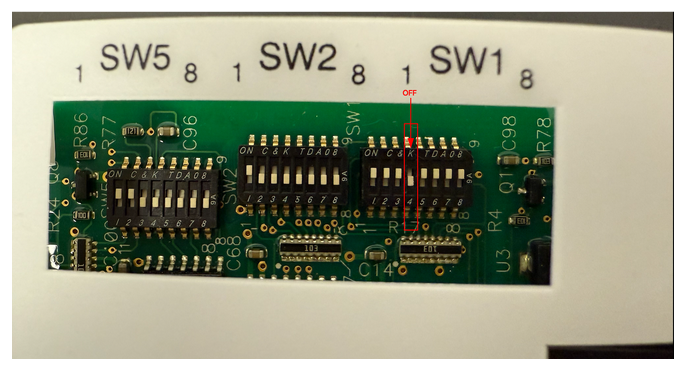
Enable Stealth
By default, the MaxiProx emits an audible beep each time it reads a card. To disable the beeper and operate completely silently, open the reader’s cover and locate the SW1 DIP block (see images below). Flip SW1-4 to the OFF (down) position. After this change, the reader will no longer play any sound when scanning cards, even on power-up.
Clone & Simulate Captured UID with iCopyX
Once you’ve captured a clean HEX dump of your target card using the MaxiProx + ESP setup, the next step is to write that UID onto a blank tag with the iCopyX handheld duplicator. Here’s how you can do it:
Power On the iCopyX
Insert fresh AA batteries into the iCopyX and press and hold the Power button until the screen lights up. You should see the main menu, which typically lists modes like Copy/Write, Read Tag, and Settings.
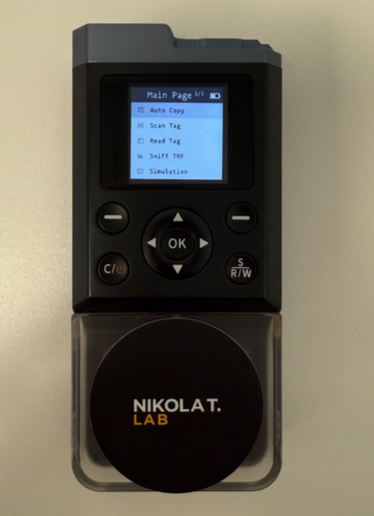
Enter "Simulation" Mode
Using the navigation buttons, select Simulation. When prompted, choose the “HID Prox ID” profile, this matches the format your MaxiProx reader uses.

Input the HEX UID
From your ESP’s browser logs (for example, HEX:12339938), carefully type in the full UID string. Take your time here, any mistyped digit will result in a clone that doesn’t work.
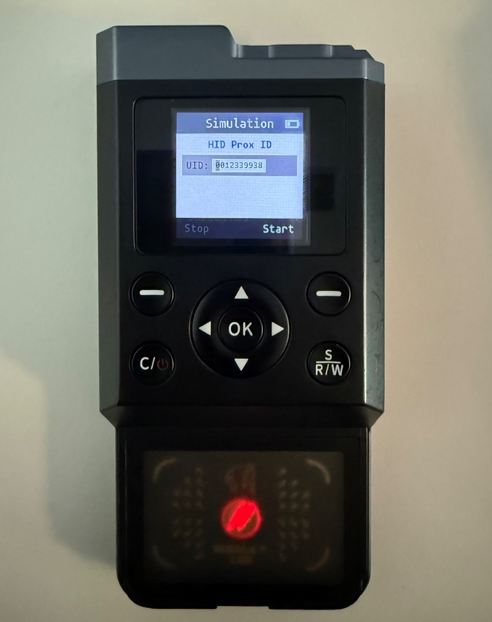
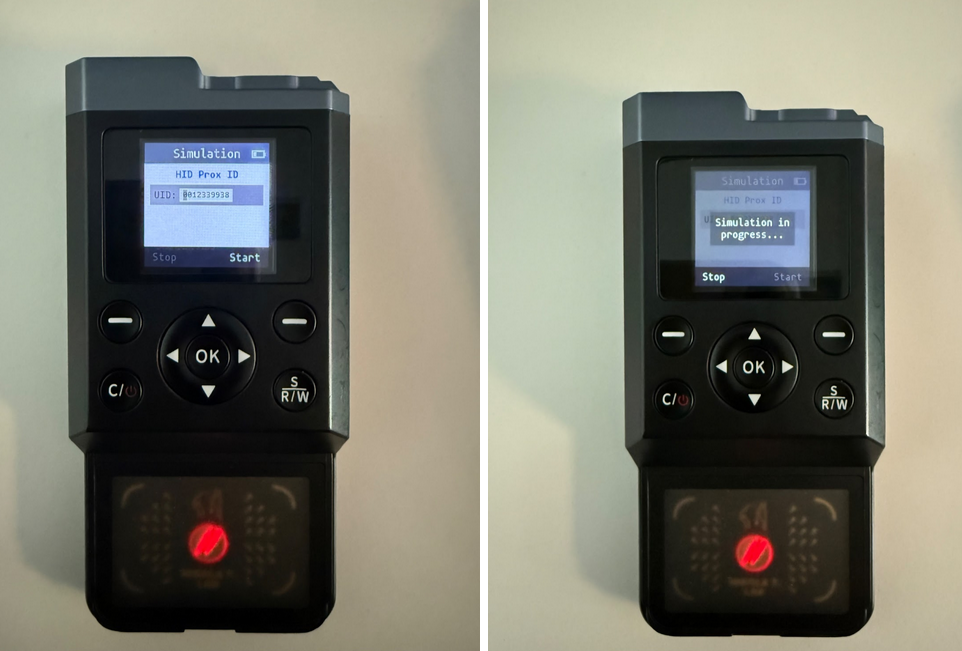
Write to a Blank Tag or Directly Simulate
After entering and confirming the UID, choose “Start”. The device will show progress. For a real-world test, present the clone to a live door reader or access control panel and confirm it grants entry.
Defend Against RFID Cloning
To mitigate the risks associated with RFID credential cloning, consider implementing the following protective measures:
Shielded Cardholders and Sleeves: Deploy RFID-blocking sleeves or shielded badge holders for proximity cards. This physical barrier significantly reduces the likelihood of covert cloning by blocking unauthorized scans.
Multi-factor Authentication (MFA): Pair RFID-based access control with additional authentication factors (PIN codes, biometric verification). Even if a credential is cloned, attackers won't bypass entry points protected by MFA.
Rolling or Dynamic Codes: Use proximity cards or systems with rolling or dynamically changing codes. Such systems render cloned credentials useless, as each authentication attempt requires a unique code.
Shorter Range Readers: Strategically install readers with minimal operational ranges, reducing opportunities for attackers to capture card data from a distance.
Regular Security Audits: Conduct periodic security assessments and penetration tests to identify vulnerabilities proactively and improve defenses against emerging threats like RFID cloning.
Staff Awareness Training: Educate employees on secure badge handling practices and raise awareness about the risks of unauthorized credential cloning.
Implementing these steps will help significantly enhance your facility's resilience against RFID-based credential cloning and unauthorized access attempts.